Library & Importing
Importing LUTs
LUT Gallery works with .cube creative LUTs (the format everyone ships in).
File → Import LUTs…(⇧⌘I), or- drag
.cubefiles (or folders of them) onto the window.
Imported LUTs are scanned into a fast local library (metadata + a cached
binary), so a .cube is only parsed once. The film strip then renders each one
on your current image.
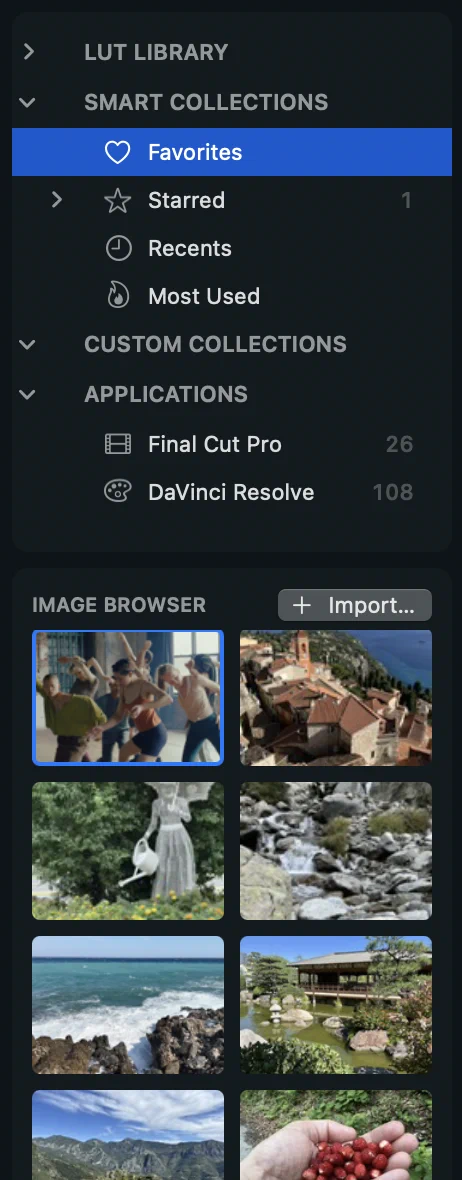
The LUT Library card (left sidebar)
Groups for finding looks quickly:
| Group | Meaning |
|---|---|
| LUT LIBRARY | All LUTs, plus one row per imported pack / folder. |
| SMART COLLECTIONS → Favorites | LUTs you’ve ♥-favorited. |
| SMART COLLECTIONS → Starred | Rated LUTs. Expand it (disclosure triangle) to filter by level — ★★★★★ … ★, each row showing only LUTs with that rating. |
| SMART COLLECTIONS → Recents / Most Used | LUTs you’ve recently applied / applied most often. |
| CUSTOM COLLECTIONS | Your own manually-curated groups. |
| APPLICATIONS | Read-only groups for LUT folders that other apps (Final Cut Pro, Resolve, Premiere) keep on disk — shown automatically when found, so you can browse looks you already have installed. |
Right-click a LUT for: Reveal in Finder (jump to the .cube file),
Rating ▸ (★ 1–5), Add to Collection ▸ (an existing collection, or
New Collection from Selection…), and Analyse. You can also set a rating
with the inline ★ on the card, or ♥ a LUT to favorite it.
Multi-select — marquee-drag or ⌘/⇧-click several LUTs, then right-click to add the whole selection to a collection, or New Collection from Selection…. Hover a card to see its source path.
LUT names: Title or File
Cards are labelled by the LUT’s TITLE by default (falling back to the
filename when the TITLE is exporter boilerplate like “Generated by Resolve”).
Flip the Title / File control in the gallery bar to label by filename
instead — handy because the real look name is usually the file name
(Log2Rec709.cube → Log2Rec709). The choice is remembered.
Importing images
- Click the + at the bottom of the window, or
- drag images onto the window (or straight onto the Canvas board).
Imported images form your pool. Supported stills include common formats,
camera RAW (developed through the RAW Decode stage) and OpenEXR —
scene-linear .exr, including DWA-compressed and multipart VFX renders (ACEScg
and friends), decoded by LUT Gallery’s own OpenEXR reader and defaulting to a
linear scene-referred input. See Colour Management.
The Image Browser card (left sidebar)
| Control | What it does |
|---|---|
| Search images… | Filter the pool by name. |
| Click | Make that image the current/hero image. |
| Marquee / ⌘-click | Select multiple images (e.g. to drag onto Canvas). |
| Click empty space | Deselect. |
| Right-click | Remove an image from the pool. |
Your pool and any grades you apply are persistent — they survive relaunches. Both images and LUTs are tracked by macOS bookmarks, so renaming or moving a file on the same volume doesn’t break the library — it’s re-found, and per-image grades follow the file.
The film strip & gallery views
The bottom strip is the current image through every LUT. It can grow from a strip into a full browser. The view-mode control cycles:
| Mode | Layout |
|---|---|
| Filmstrip + image | A single row of LUT thumbnails under the hero. |
| Gallery + image split | A taller grid of LUTs sharing space with the image. |
| Full gallery | The LUT grid fills the window for fast browsing. |
The card separator on the left is draggable, so you control how much room the LUT library vs. the image browser each get.