The Inspector — Grade Controls
When an image is selected, the right-hand Inspector holds the grade pipeline, top to bottom in the order it’s applied, with a divider between each stage:
Image info → Input Transform → RAW Decode (RAW only) → Corrections (White Balance + Base) → LUT.
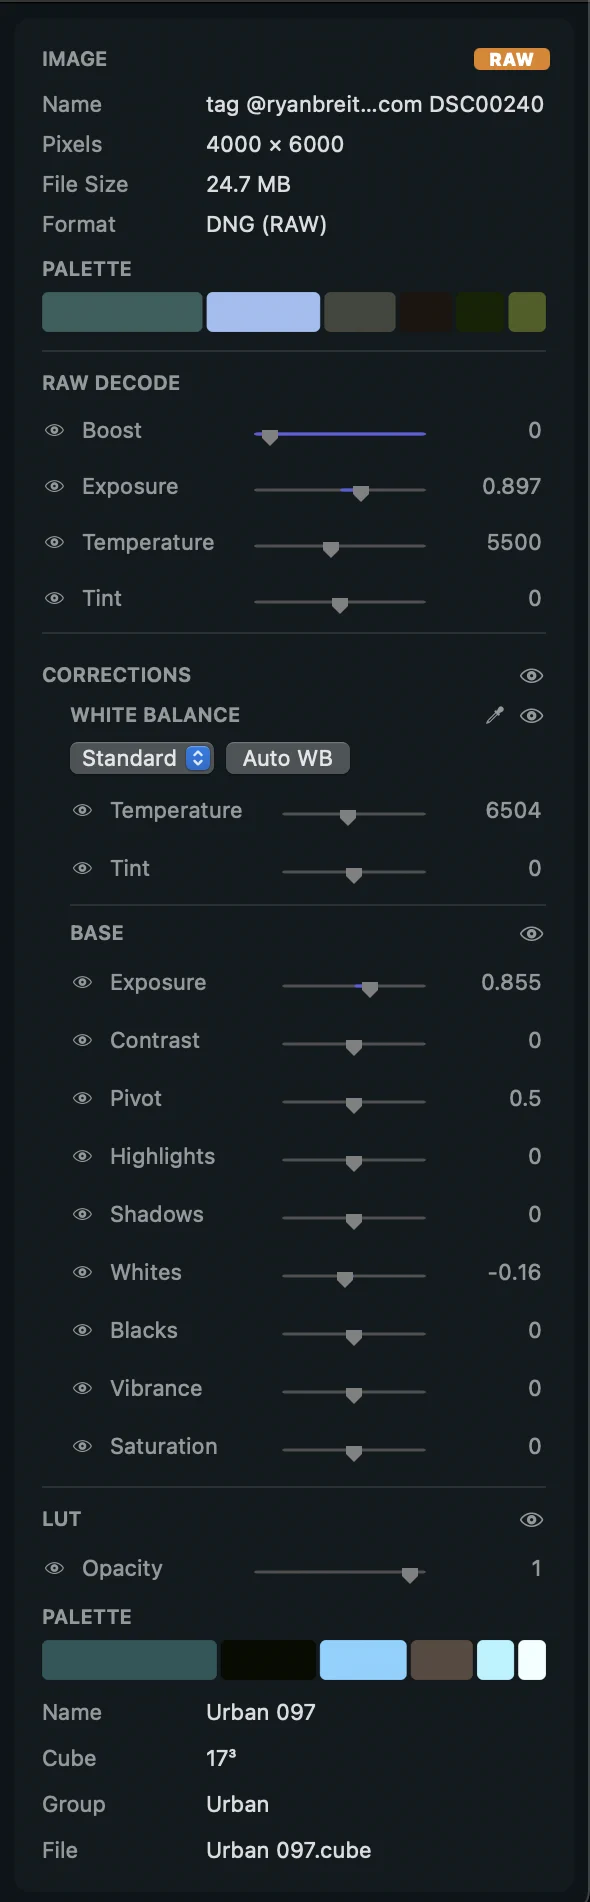
How the sliders work
Every parameter is a slider row with three parts:
- Name + reset — click the parameter name to reset it to its default.
- Slider — drag to change the value; the number field shows/accepts the exact value.
- Eye (👁) — momentary bypass — hold the eye to temporarily set that one parameter to its default so you can see what it contributes; release to restore your value. It’s a peek, not a toggle — nothing is changed.
Section headers — reset & bypass
A stage header can carry up to two controls, depending on the stage:
- Title = reset — hover the header and it reads Reset; click to reset that stage to defaults (it just beeps if it’s already at default). (Input Transform, RAW Decode and Corrections/White Balance/Base all reset this way.)
- Eye (👁) = bypass — a persistent on/off for the whole stage (distinct from the per-slider momentary eye). Click to switch the stage off and on; the rows dim while it’s bypassed. (The Corrections group, White Balance, Base and the LUT section have a bypass eye; Input Transform and RAW Decode do not.)
tip
See the untouched image: hold the
\key in the viewer to bypass the whole grade (White Balance + Base + LUT) for as long as you hold it — a quick before/after against the source.
Colour palette (before & after)
LUT Gallery pulls a small representative colour palette from the image so you can read its dominant tones at a glance — and see exactly what a look does to them.
- IMAGE → Palette shows the source colours (before any LUT).
- LUT → Palette shows the graded colours (after the LUT). It appears only while a LUT is active, so the two strips line up as a clean before → after.
- A swatch’s width is its share of the frame — the strip is weighted, so the colours that cover the most image are the widest.
- Hover any swatch for its values: RGB, its share of the image (%), the hex code, and perceptual OkLab L/a/b.
Input Transform
How the source is decoded into the working colour space before anything else happens. Two popups: a mode and a space.
| Mode | Use it for |
|---|---|
| Auto (sRGB / embedded) | Ordinary stills — a colour-managed decode from the file’s embedded (or sRGB) profile. The default. |
| Camera / scene-referred | Log / camera footage. The space popup lists the camera spaces (ARRI LogC, RED Log3G10, Sony S-Log3, …) or ACES IDTs from your active OCIO config; the image is decoded through OCIO into the working space. |
| Display-encoded source | A finished, display-referred image in a known encoding (applies the inverse EOTF). |
| Inverse ODT (un-tone-map) | Recover working-space values from a finished deliverable by reversing an ODT. |
note
Scene-linear
.exrfiles default to a linear scene-referred input automatically, so they grade correctly instead of being read as sRGB.
The default new images inherit is set in Settings → Colour; see Colour Management for the pipeline (Display-referred vs ACES) and the output/display transform.
RAW Decode (RAW files only)
How the camera raw is developed before grading. Shown only when the source is a RAW file — flagged with a RAW badge in the IMAGE section header.
| Control | What it does |
|---|---|
| Boost | Overall strength of the RAW development / detail recovery. |
| Exposure | Brightness applied at the raw stage, in stops. |
| Temperature | Warm ↔ cool white-balance of the raw decode (Kelvin feel). |
| Tint | Green ↔ magenta white-balance of the raw decode. |
Corrections (White Balance + Base)
White Balance and Base live together under a Corrections group. The group header has its own bypass eye — one click toggles both stages off — and a reset that clears both. Each sub-section still has its own eye and reset.
White Balance
Neutralises or shifts colour temperature after decode. Applied in the working colour space, so it behaves consistently across looks.
| Control | What it does |
|---|---|
| Temperature | Warm (amber) ↔ cool (blue) shift. |
| Tint | Green ↔ magenta shift. |
Above the sliders is a tools row:
- Mode (Standard / Skin) — what the eyedropper aims for.
- Eyedropper (in the section header) — click a neutral grey (Standard mode) or skin (Skin mode) area of the image to set white balance from that sample. Skin mode steers hue toward a natural skin tone while keeping a stable temperature.
- Auto WB — region-based automatic white balance. The dot beside it is a confidence semaphore — green = confident, amber = weak guess, red = scene unusable (and a beep, nothing applied) — that appears on press and fades away.
Base
Per-image tone shaping — the “develop” stage before any creative LUT. (These are deliberately not part of a shareable look; they belong to the shot.)
| Control | What it does |
|---|---|
| Exposure | Overall brightness in stops. |
| Contrast | Expands/compresses tones around the pivot. |
| Pivot | The tonal point contrast rotates around (set where “mid” is). |
| Highlights | Recover or lift the brightest tones. |
| Shadows | Lift or deepen the darkest tones. |
| Whites | The white clipping point. |
| Blacks | The black clipping point. |
| Vibrance | Smarter saturation — boosts muted colours more than already-saturated ones; gentler on skin. |
| Saturation | Uniform colour intensity. |
Creative Look / LUT opacity
When a creative LUT is active it appears here with an Opacity slider (with its own reset + eye), letting you blend the look from 0 % (off) to 100 % (full). This is the same standard slider as everything else. The LUT section also shows the graded palette — your image’s colours after the look — to compare against the source palette up in the IMAGE section.
note
Editing is non-destructive and live. Adjustments re-grade the hero image in real time; the film strip thumbnails update too, so a change to exposure or white balance is reflected through every LUT.
LUT controls & analysis
The Inspector has no tabs — sections are shown together and follow context. In Preview, the LUT you’ve applied appears as the Creative Look / LUT section above (its Opacity); in Canvas the LUT controls are the LUT Stack.
In Analysis Mode the Inspector adds the
LUT’s analysis cards: LUT Information (LUT type, cube size, and the LUT’s own
Description read from its .cube header), Diagnostics, Semantic Tags
and Actions.